 AWS Integration Guide
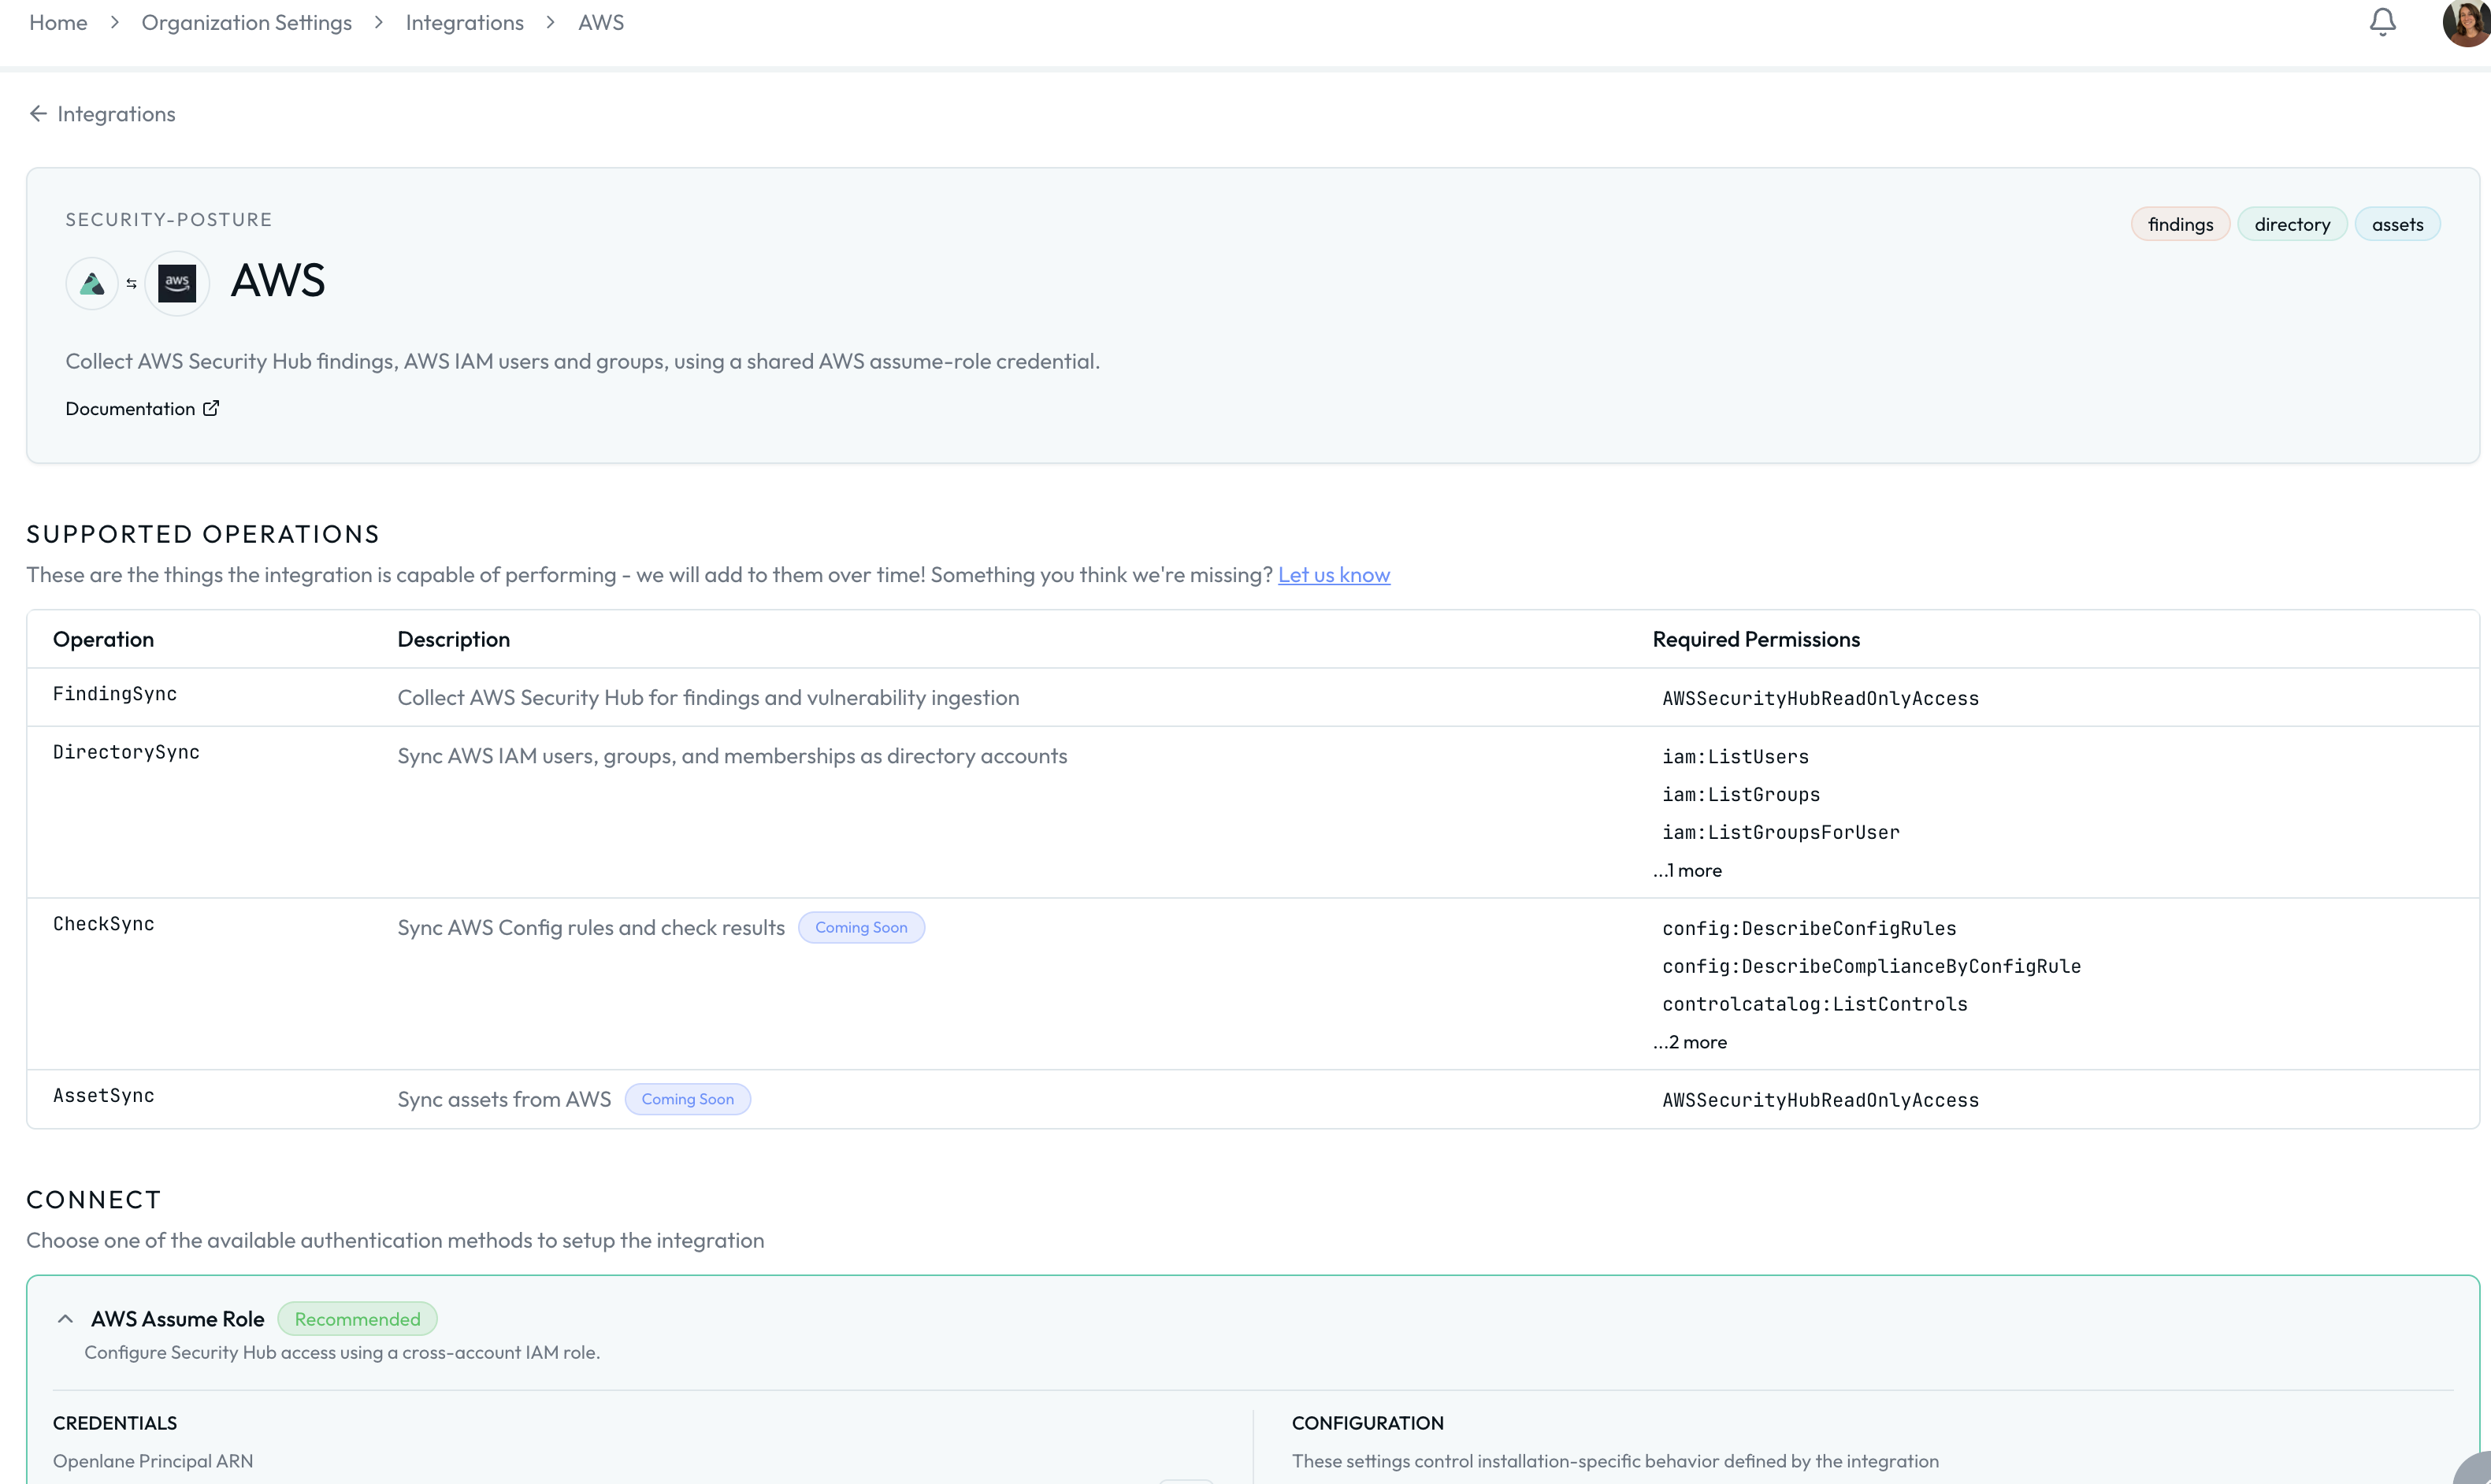
If your team runs infrastructure on AWS, this integration brings Security Hub findings and AWS Config assessment data into Openlane automatically. It uses a read-only, cross-account IAM role, so Openlane reads your security data without touching your configuration.
Integration Snapshot
| Item | Details |
|---|---|
| Primary use case | Continuous AWS infrastructure security monitoring in Openlane |
| Data direction | One-way (AWS -> Openlane), read-only |
| AWS services used | STS, Security Hub, AWS IAM (optional), AWS Config (optional) |
| Setup model | Cross-account IAM role with sts:AssumeRole and sts:ExternalId |
| Openlane records created | Vulnerabilities and Findings (created or updated), Directory Accounts (created or updated), linked to your AWS integration |
Key Capabilities
- Read-Only Cross-Account Access: Uses a dedicated IAM role so Openlane can read your environment without making configuration changes.
- Security Findings Ingestion: Pulls Security Hub findings and normalizes them into Openlane vulnerability and finding records, giving you a single place to track remediation timelines and SLA compliance (SOC 2: CC7, CC8).
- AWS IAM: Optionally read user access and groups and associate with identity holders in Openlane.
- AWS Config: Optionally reads config rules and metadata to help validate that compliance controls like change management and access governance are covered.
Prerequisites
- IAM permissions to create IAM roles and policies in the AWS account that Openlane will access.
- Security Hub enabled in the accounts and regions you want monitored.
- If using the CloudFormation option: AWS CLI installed and authenticated against the target account.
Step-by-Step Setup
Step 1: Get Your Openlane Connection Values
Before creating anything in AWS, retrieve the two values Openlane provides for your tenant:
- Navigate to Organization Settings > Integrations and find AWS.
- Click Configure.
- Copy the pre-generated values shown on the configuration page:
- Openlane Principal ARN — the ARN of the Openlane IAM identity that will assume the role in your account
- External ID — a unique identifier scoped to your Openlane tenant, used to prevent confused deputy attacks
You will need both of these in the next step.
Step 2: Create the Cross-Account IAM Role
Choose the method that fits your workflow. Both produce the same result — a cross-account IAM role with a trust policy that allows Openlane to assume it.
Option A: CloudFormation
Use the Openlane CloudFormation template to create the role. Security Hub access is always granted. IAM and Config access are opt-in and default to disabled.
- Download the template:
curl -fsSL https://docs.theopenlane.io/integrations/setup/aws/openlane-aws-integration-role.yaml \
  -o openlane-aws-integration-role.yaml
Run aws sts get-caller-identity to confirm you are targeting the correct account before proceeding.
- Deploy the stack using the values copied from the Openlane configuration page:
aws cloudformation deploy \
  --stack-name openlane-aws-integration \
  --template-file openlane-aws-integration-role.yaml \
  --capabilities CAPABILITY_NAMED_IAM \
  --parameter-overrides \
    OpenlanePrincipalArn=<OPENLANE_PRINCIPAL_ARN> \
    ExternalId=<OPENLANE_EXTERNAL_ID> \
    HomeRegion=<SECURITY_HUB_HOME_REGION> \
    EnableIAMAccess=false \
    EnableAuditConfig=false
Replace the following values before running:
<OPENLANE_PRINCIPAL_ARN>— copied from the Openlane Principal ARN field on the configuration page<OPENLANE_EXTERNAL_ID>— copied from the External ID field on the configuration page<SECURITY_HUB_HOME_REGION>— your Security Hub aggregation home region (e.g.us-east-1)
Optionally enable additional data sources by setting EnableIAMAccess or EnableAuditConfig to true.
| Parameter | Required | Description |
|---|---|---|
OpenlanePrincipalArn | Yes | Copied from the Openlane configuration page |
ExternalId | Yes | Copied from the Openlane configuration page |
HomeRegion | Yes | Your Security Hub aggregation home region (e.g. us-east-1) |
EnableIAMAccess | No | Set to true to grant IAM user and group read access (default: false) |
EnableAuditConfig | No | Set to true to grant AWS Config and Control Catalog read access (default: false) |
- Once the stack deploys, capture the
RoleArnoutput:
aws cloudformation describe-stacks \
  --stack-name openlane-aws-integration \
  --query 'Stacks[0].Outputs[*].[OutputKey,OutputValue]' \
  --output table
Example output:
DescribeStacks
| Field | Example Value |
|---|---|
HomeRegion | us-east-1 |
ExternalId | openlane-6e322e11-a17c-4308-adf2-11h5f2a1a4ag |
RoleArn | arn:aws:iam::<YOUR_ACCOUNT_ID>:role/OpenlaneIntegrationReadOnlyRole |
Copy the RoleArn value — you will enter it into Openlane in Step 4.
Option B: AWS Console
- In the AWS Console, navigate to IAM > Roles > Create role.
- Under Trusted entity type, select Custom trust policy.
- Paste the following, replacing the placeholders with the values from the Openlane configuration page:
Trust policy JSON
{
  "Version": "2012-10-17",
  "Statement": [
    {
      "Effect": "Allow",
      "Principal": {
        "AWS": "<OPENLANE_PRINCIPAL_ARN>"
      },
      "Action": "sts:AssumeRole",
      "Condition": {
        "StringEquals": {
          "sts:ExternalId": "<OPENLANE_EXTERNAL_ID>"
        }
      }
    }
  ]
}
- Click Next.
- Click Next again to skip attaching managed policies — you will add an inline policy instead.
- Give the role a name (e.g.
OpenlaneIntegrationReadOnlyRole) and click Create role. - Open the role you just created, go to the Permissions tab, and click Add permissions > Create inline policy.
- Switch to the JSON editor and paste the policy below, removing any blocks for data sources you do not want to grant:
Inline policy JSON
{
	"Version": "2012-10-17",
	"Statement": [
		{
			"Sid": "HealthCheckIdentity",
			"Effect": "Allow",
			"Action": [
				"securityhub:Describe*"
			],
			"Resource": "*"
		},
		{
			"Sid": "SecurityHubReadFindings",
			"Effect": "Allow",
			"Action": [
				"securityhub:GetFindings",
				"securityhub:Get*",
				"securityhub:List*",
				"securityhub:BatchGet*",
				"securityhub:Describe*"
			],
			"Resource": "*"
		},
		{
			"Sid": "IAMReadUsers",
			"Effect": "Allow",
			"Action": [
				"iam:ListUsers",
				"iam:ListGroups",
				"iam:ListGroupsForUser",
				"iam:ListUserTags"
			],
			"Resource": "*"
		},
		{
			"Sid": "AuditConfigReadRules",
			"Effect": "Allow",
			"Action": [
				"config:DescribeConfigRules",
				"config:DescribeComplianceByConfigRule",
				"controlcatalog:ListControls",
				"controlcatalog:ListControlMappings",
				"controlcatalog:ListCommonControls"
			],
			"Resource": "*"
		}
	]
}
- Click Next, give the policy a name, and click Save.
- Copy the ARN shown at the top of the role summary page — you will enter it into Openlane in Step 4.
Step 3 : Configure Security Hub Coverage
- Enable Security Hub for the target accounts and regions.
- If you use AWS Organizations, configure delegated admin and cross-region aggregation.
- Use the same home region for
HomeRegionin the CloudFormation parameters and in Openlane.
Step 4: Connect AWS in Openlane
- Return to Organization Settings > Integrations > AWS > Configure.
- Enter the following — the External ID is already pre-populated from Step 1 but ensure it matches if you've navigated away from the page:
| Field | Required | Purpose |
|---|---|---|
roleArn | Yes | Cross-account IAM role ARN from the CloudFormation RoleArn output |
homeRegion | Yes | Security Hub aggregation home region (default: us-east-1) |
linkedRegions | No | Explicit region list to filter findings by region |
accountId | No | |
accountScope | No | all (default) or specific to limit to listed account IDs |
accountIds | Conditional | Required when accountScope is specific |
sessionToken | No | Session token when using temporary static credentials |
sessionDuration | No | STS session duration override (Go duration string, e.g. 1h30m) |
sessionName | No | STS session name override |
accountId | No | AWS account identifier for reference |
Configuration
Optionally configure data ingestion behavior:
AWS Security Hub Sync
| Setting | Description |
|---|---|
| Disable | Turn off Security Hub finding ingestion without disconnecting the integration |
| Filter Expression | CEL expression evaluated against each finding — only findings that match are ingested |
Filter expression examples:
# Ingest only critical and high severity findings
payload.Severity.Label == 'CRITICAL' || payload.Severity.Label == 'HIGH'
# Exclude a specific finding type
payload.Type != 'Software and Configuration Checks/Vulnerabilities/CVE'
Directory Account Sync
| Setting | Description |
|---|---|
| Disable | Turn off IAM user and group ingestion without disconnecting the integration |
| Disable Group Sync | Sync IAM users only — skip group membership |
| Filter Expression | CEL expression evaluated against each IAM user record — only records that match are ingested |
Filter expression examples:
# Ingest only users under the /engineering/ IAM path
payload.path.startsWith('/engineering/')
CEL expressions have access to the full raw payload for each record via payload.<field>.
Alternate Authentication: Static Credentials Setup
If cross-account IAM role assumption is not available in your environment — for example, if your AWS account does not support STS, if you are working in an isolated environment, or if you need to get started quickly without setting up a cross-account role — you can authenticate using a long-lived IAM user access key instead.
Static credentials do not rotate automatically and carry more risk than the cross-account role approach. Use them only when role assumption is not an option, scope the IAM user permissions as narrowly as possible, and rotate the key on a regular cadence.
Step 1: Create a Dedicated IAM User
- In the AWS Console, navigate to IAM > Users > Create user.
- Enter a name (e.g.
openlane-integration-readonly) and click Next. - Select Attach policies directly and click Next — you will add an inline policy after creation instead of using a managed policy.
- Click Create user.
- Open the user you just created, go to the Permissions tab, and click Add permissions > Create inline policy.
- Switch to the JSON editor and paste the policy below, removing any blocks for data sources you do not need:
Inline policy JSON
{
	"Version": "2012-10-17",
	"Statement": [
		{
			"Sid": "HealthCheckIdentity",
			"Effect": "Allow",
			"Action": [
				"securityhub:Describe*"
			],
			"Resource": "*"
		},
		{
			"Sid": "SecurityHubReadFindings",
			"Effect": "Allow",
			"Action": [
				"securityhub:GetFindings",
				"securityhub:Get*",
				"securityhub:List*",
				"securityhub:BatchGet*",
				"securityhub:Describe*"
			],
			"Resource": "*"
		},
		{
			"Sid": "IAMReadUsers",
			"Effect": "Allow",
			"Action": [
				"iam:ListUsers",
				"iam:ListGroups",
				"iam:ListGroupsForUser",
				"iam:ListUserTags"
			],
			"Resource": "*"
		},
		{
			"Sid": "AuditConfigReadRules",
			"Effect": "Allow",
			"Action": [
				"config:DescribeConfigRules",
				"config:DescribeComplianceByConfigRule",
				"controlcatalog:ListControls",
				"controlcatalog:ListControlMappings",
				"controlcatalog:ListCommonControls"
			],
			"Resource": "*"
		}
	]
}
- Click Next, give the policy a name (e.g.
OpenlaneIntegrationReadOnly), and click Save.
Step 2: Generate an Access Key
- Open the IAM user you just created and go to the Security credentials tab.
- Under Access keys, click Create access key.
- Select Third-party service as the use case and click Next.
- Click Create access key.
- Copy both the Access key ID and the Secret access key — the secret is only shown once and cannot be retrieved later.
Step 3: Connect AWS in Openlane Using Static Credentials
- Navigate to Organization Settings > Integrations > AWS > Configure.
- Enter the following fields — leave
roleArnandexternalIdempty, as they are not used with static credentials:
| Field | Required | Purpose |
|---|---|---|
accessKeyId | Yes | AWS Access Key ID from the IAM user |
secretAccessKey | Yes | AWS Secret Access Key from the IAM user |
sessionToken | No | Include only when using temporary credentials obtained via sts:GetSessionToken |
- Click Save.
Openlane authenticates directly with the provided key pair without attempting role assumption. All data collection capabilities are identical to the cross-account role approach.
Validate Connection
After saving, Openlane runs a health check against AWS and displays the result on the Installed tab of the Integrations page. A Healthy badge confirms connectivity. If the badge shows Needs Attention, review the troubleshooting section below.
Supported Operations
This integration is read-only and one-directional. Openlane assumes your IAM role, validates identity with STS, then pulls data from the AWS services you granted access to. Openlane never pushes configuration changes back into AWS.
What Openlane Creates From Findings
Each Security Hub finding becomes a normalized finding or vulnerability record in Openlane:
- Converts AWS findings into findings and vulnerabilities with severity, status, summary, description, timestamps, and source URIs preserved.
- Deduplicates by
externalID(with CVE fallback matching when present), so repeated scans update existing records instead of creating duplicates. - Links each vulnerability to the AWS integration that produced it.
- Stores raw payload data
What You Can Do Next
Once the findings land in Openlane, you can link them to affected assets, create remediation tasks, and track resolution against SLAs. During audits, this gives you a clear trail from finding to fix that maps directly to SOC 2 CC7 (system monitoring) and ISO 27001 A.12.6 (technical vulnerability management).
Disconnect
To remove this integration, navigate to Organization Settings > Integrations and select the Installed tab. Open the menu on the integration card and select Disconnect. This removes stored credentials and stops all collection activity. You can reconnect later by configuring the integration again.
Troubleshooting
- Access denied on connect or health check: verify the role ARN, that the trust policy Principal matches the Openlane Principal ARN from the configuration page, and that the external ID matches.
- No findings ingested: verify Security Hub is enabled in the configured region and that
EnableSecurityHub=truewas set when deploying the CloudFormation stack. - No IAM data: verify
EnableIAMAccess=truewas set when deploying the CloudFormation stack. - No Config data: verify
EnableAuditConfig=truewas set and AWS Config is enabled in the target account.